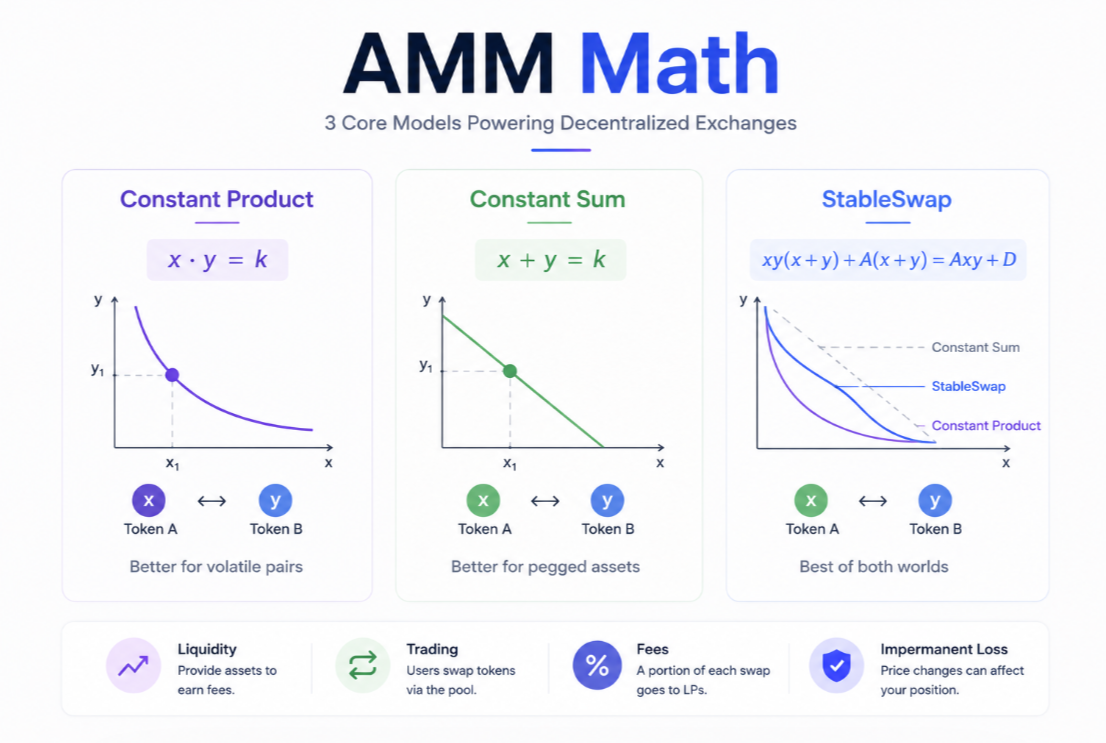
Every automated market maker is a curve. The curve defines the relationship between the two tokens in a pool: when you put more of one token in, how much of the other do you get out. The choice of curve is the single biggest design decision an AMM makes — it determines what pairs the pool suits, how much slippage traders eat, and how impermanent loss behaves for LPs. Three curves cover most of the DEX landscape in 2026.
Curve 1: constant product (Uniswap V2 style)
The formula: x * y = k, where x and y are the pool's token balances and k is a constant.
Trading works by keeping k constant. If you deposit some token X into the pool (making x larger), the pool must give you enough token Y that the product x * y stays equal to k. That means y decreases by exactly the right amount to preserve the equation.
The important property: as you trade more of X for Y, the effective price of Y in terms of X gets worse. Small trades barely move the price; large trades move it dramatically. This is price impact — the difference between the pool's marginal price (what you'd pay for an infinitesimal trade) and the average price you actually pay across your whole trade.
For a pool with 100 ETH and 250,000 USDC (marginal price of ETH: $2,500):
- Swap 1 ETH: you get ~2,475 USDC (avg price $2,475, price impact ~1%)
- Swap 10 ETH: you get ~22,727 USDC (avg price $2,273, price impact ~9%)
- Swap 50 ETH: you get ~83,333 USDC (avg price $1,667, price impact 33%)
Big trades on small pools eat huge slippage. This is the fundamental limitation of constant product AMMs.
Constant product is used by: Uniswap V2, most V2-style forks (Sushi, Pancake V2), and V3 mathematically underneath its concentrated liquidity abstraction.
Best for: volatile pairs where the price genuinely moves a lot and you want liquidity available at any price.
Curve 2: constant sum
The formula: x + y = k.
This curve is a straight line. Every unit of X trades for exactly one unit of Y, always, regardless of pool composition. There is no price impact — trades don't move the price.
Sounds perfect, but it fails in a critical way: if the market price of X vs Y is ever different from 1:1, arbitrageurs drain the pool of whichever token is worth more. The pool ends up 100% of the losing token, with zero of the winning one. LPs lose everything.
Constant sum is useful only for pairs that provably trade 1:1 forever with no exceptions. In practice, no pair meets this criterion perfectly.
Used by: essentially nothing in production. But the concept matters because it's a building block for hybrid curves.
Curve 3: StableSwap (Curve Finance)
Curve Finance solved the "stable pairs deserve better than constant product" problem with a hybrid curve. Near the peg (when the two tokens are close to their expected 1:1 ratio), it behaves like constant sum — very low slippage. As the pool composition drifts far from balanced, it transitions to constant product — protecting LPs from being drained.
The math is a tunable curve with a parameter A (amplification). Higher A means the pool acts more like constant sum near the peg (better for stables). Lower A means it acts more like constant product (safer against depegs).
For USDC/USDT/DAI trading near $1.00, a StableSwap pool offers 100x-1000x better price than a constant product pool would for the same TVL. That's the reason Curve dominated stablecoin swaps for years.
Used by: Curve Finance (obviously), most stableswap forks, various stablecoin pools on other chains.
Best for: pairs that trade near 1:1 most of the time — stablecoins, LSTs vs ETH, wrapped assets.
Curve 4: concentrated liquidity (Uniswap V3)
Rather than a single curve for the whole pool, V3 lets LPs allocate liquidity within specific price ranges. Within each LP's range, the pool behaves like a virtual constant product curve, but the "virtual reserves" are much larger than the actual deposit — giving concentrated capital efficiency.
Explained fully in the previous Uniswap V3 article. Here it's enough to say: V3 is not a single curve; it's a mechanism for combining many LP-specific constant product curves into a single pool.
Used by: Uniswap V3, Uniswap V4 (with hooks), PancakeSwap V3, most modern DEX designs.
Best for: any pair where LPs are willing to actively manage ranges. Increasingly the default for major pairs.
Curve 5: weighted pools (Balancer)
Balancer generalizes constant product from 2 tokens to N tokens with arbitrary weights. A traditional 50/50 constant product pool is a special case; Balancer supports 80/20, 60/20/20, and other configurations.
The math: instead of x * y = k, it's the product of each token's balance raised to its weight, kept constant.
Useful for: index-fund-like pools (hold 5 tokens in specified weights, LP earns fees while maintaining exposure), single-sided liquidity (where an 80/20 pool minimizes IL for the majority token), and structured DeFi products.
The price impact vs pool size tradeoff
For any AMM, price impact is roughly proportional to trade size divided by pool size. A $1M trade on a $100M pool has ~1% price impact; the same trade on a $10M pool has ~10%.
This is why deep liquidity matters. Whales choose DEXs by pool depth, not just by name. Aggregators like 1inch and Cow Swap route across many pools to minimize combined price impact.
For a retail user, the practical implication: for any trade, check the price impact your wallet shows. If it's more than 0.5-1% for a routine swap, either the pool is small or your trade is too large. Consider splitting across venues or using an aggregator.
Fees vs curve choice
Different fee tiers make sense for different curves:
- Stable pairs on StableSwap: 0.01-0.04% (low volatility, tight spreads)
- Standard volatile pairs on constant product: 0.30% (traditional Uniswap V2 fee)
- Exotic pairs: 1% or higher (compensate LPs for volatility risk)
Uniswap V3 offers multiple fee tiers per pool because the same pair can have different optimal fees at different times or for different sub-markets.
Impermanent loss varies by curve
- Constant product IL: standard, well-documented. About 0.6% loss for a 25% price move.
- StableSwap IL: much lower for near-peg movements, comparable to constant product for large depegs.
- V3 concentrated IL: amplified within your range, converts fully to one token if price moves outside range.
- Weighted pools IL: reduces with weight — an 80/20 pool has ~5x less IL than a 50/50 pool for the same price movement.
IL matters more for volatile pairs than stable ones, which is another reason StableSwap dominates stables.
Reading pool composition
For any DEX pool, its Etherscan or DEX-analytics page shows:
- Current reserves (how much of each token)
- 24h volume
- Fees earned
- Utilization (how often is depth being consumed)
For LPs, these tell you whether the pool is actually earning fees or is dead capital. For traders, they tell you how much slippage to expect on a given trade size.
The takeaway
Understanding which curve a DEX uses tells you what the pool is optimized for. Uniswap V2/V3 constant product for anything. Curve StableSwap for stables and LSTs. Balancer for index-like exposure. V3 concentrated liquidity when LPs are willing to manage.
For traders, this means checking the right venue for each trade. USDC to USDT should go through Curve or a V3 stable pool, not V2. ETH to USDC should go through V3 or an aggregator that routes across V3 and Curve LST pools.
For anyone building or evaluating a DeFi protocol, the curve choice is the first design decision. The rest of the mechanics follow from there.